|
> WS_FTP > Frontpage 2000 > Frontpage 98 > Publisher 98 > Netscape Composer 4.x > Netscape Composer 7.x > Counter Script > Form Mail |
| Publisher 98 |
This page illustrates how to use the upload utility that comes pre-installed with Microsoft Publisher. We do not go into detail on how to use Publisher to create a webpage nor will our staff be able to offer you directions. If you need assistance in creating a webpage using Microsoft Publisher you will want to contact the software manufacturer.
1. After you create a webpage and are ready to upload, go to File then click on Publish to Web.
Note: If you cannot locate the "Publish to Web" option, you need to choose "Create Website from Current Publication" to prepare your website for uploading.
2. At the "Publish Your Files on the Web" window, click NEXT.
3. If a profile has been setup in Publisher before, you will be introduced with a "Select a Web Server" window. If this window appears, click on the NEW button to make a new profile for YHTI. If you do not see this window, move on to step 4.
4. At the "Name the Web Server" window type "YHTI" in the "Descriptive name:" column and hit NEXT.
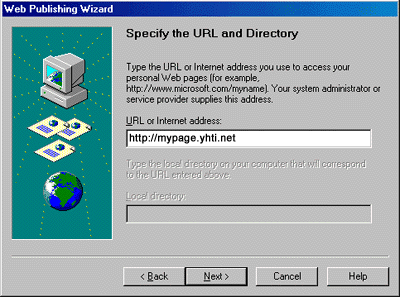
5. At the "Specify the URL and Directory" window type "http://mypage.yhti.net" in the URL address, as shown in the image below, and hit NEXT:

6. At the "Enter Network Password" window input your username (all lowercase) in the "User name:" column, and enter your password (all lowercase) in the "Password:" column, then hit OK.
7. At the "Select Your Service Provider" window, make sure FTP is listed in the "Service Provider" column and hit NEXT.
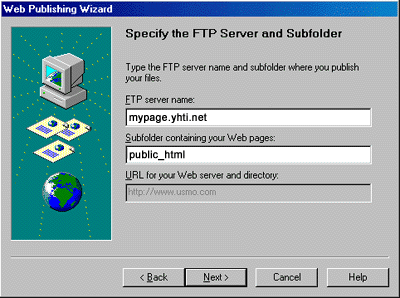
8. At the "Specify the FTP Server and Subfolder" window input "public_html" (all lowercase) in the "Subfolder containing your Web pages" column, like illustrated in the image below.

9. Finally, at the "Publish Your Files" window hit FINISH and your uploading will begin.
Now that the upload settings are correct, you can choose NEXT instead of NEW at the "Select a Web Server" window illustrated in step 3, when trying to upload in the future.